
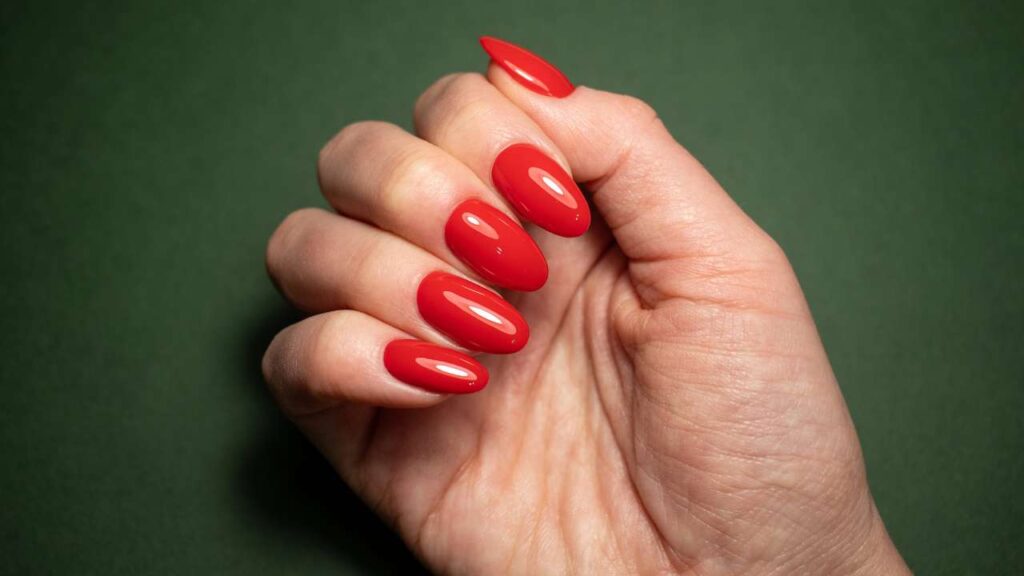
You are rushing to a morning meeting, and as you reach for your coffee, you notice something off. That gel manicure you got last week? The corners feel slightly sharp, catching on your silk blouse. Or maybe the shape that looked perfect in the salon now feels a bit too square for typing comfortably on your laptop. You pause and wonder: Can I actually file these down myself, or will I ruin the whole manicure?
Here’s the truth that might surprise you: Yes, you absolutely can file gel nails after they’ve been cured under a UV or LED lamp. But before you grab the nearest nail file from your drawer, there’s a right way and several wrong ways to do this. The internet is full of conflicting advice, some sources warn you’ll “break the seal” and cause immediate peeling, while others suggest filing away with abandon. Neither extreme tells the complete story.
Filing cured gel nails is a skill that professional nail technicians use regularly to perfect their work. It requires understanding gel nail structure, choosing the right tools, and applying proper technique. When done correctly, post-cure filing can refine your manicure’s shape, smooth out minor application ridges, and help you maintain a polished look between salon visits. When done incorrectly, it can compromise your gel’s integrity, damage your natural nails, or shorten your manicure’s lifespan.
In this article, you’ll discover the professional answer to whether filing after curing is safe, learn the exact step-by-step technique for doing it at home, understand common mistakes that can damage your nails, and know when to handle adjustments yourself versus when to seek professional help. Whether you’re maintaining a manicure between appointments or simply want to understand your nail care better, you’ll walk away with the knowledge to make informed decisions about your gel nails.
Can you file gel nails after curing? The professional answer
The definitive answer is yes, filing gel nails after the curing process is not only possible but is actually a standard practice in professional nail services. When a UV or LED lamp cures gel polish, it triggers a chemical process called polymerization. This transforms the liquid gel into a hard, durable surface that bonds to your natural nail. Once this process is complete, the gel becomes a stable structure that can be shaped and refined without compromising its fundamental integrity.
Many people worry about “breaking the seal” when filing cured gel. This concern stems from the professional technique of capping the free edge, where the nail technician swipes gel polish along the very tip of the nail during application. This cap helps prevent shrinkage during curing and creates a clean, finished edge. While this seal does provide some aesthetic and protective benefits, it’s not as fragile as many believe. High-quality gel products, especially when applied to properly prepared nails, bond tenaciously to the nail plate through chemical adhesion, not just through the cap at the tip.
The reality is that the seal is primarily aesthetic rather than structural. Modern gel formulations create a molecular bond with the nail surface during the prep and application process. At our nail salon, our dry preparation technique maximizes this adhesion by making sure the nail plate is completely dehydrated before gel application. This scientific approach means that even if you file the free edge after curing, the gel won’t simply slide off or peel away, provided the original application was done correctly.
There are several practical scenarios where post-cure filing becomes necessary or beneficial:
You’ve noticed a small ridge or uneven spot in the gel application that you didn’t catch immediately
Your nails grow quickly, and the shape becomes unmanageable before your next scheduled appointment
You want to transition from a square shape to something more rounded for comfort during daily tasks
There’s a tiny bit of gel overflow at the sidewalls that’s catching on fabric
All of these situations can be addressed through careful filing after the gel has cured.
“The bond between gel and the natural nail is chemical, not mechanical. When applied correctly, it’s strong enough to withstand minor adjustments without compromising the manicure’s longevity.” , Jessica Miller, our Professional Nail Technician
The key difference between successful and damaging post-cure filing lies in three critical factors: the tools you use, the technique you apply, and your understanding of nail structure. Professional nail technicians spend years perfecting these skills. At Xpert Russian Manicure Salon, our precision e-file shaping techniques create such optimal nail architecture during the initial application that post-cure adjustments are rarely needed. However, when they are necessary, whether for client preference or practical reasons, our technicians know exactly how to refine cured gel without compromising the manicure’s three-to-five-week longevity or the health of the natural nail underneath.
How to file gel nails after curing: step-by-step technique
Successfully filing gel nails after curing requires the right tools, proper technique, and attention to detail. Following these professional-grade steps will help you achieve salon-quality results while protecting both your gel manicure and your natural nails.
Tool selection: choosing the right file
Your choice of nail file makes all the difference. For significant reshaping, such as transitioning from a square to an oval shape, use a 180-grit file. This medium-grit level is aggressive enough to reshape efficiently but gentle enough not to create excessive heat or damage. For minor smoothing, edge refinement, or removing small application ridges, opt for a 240-grit file or a flexible emery board. These finer options allow for precise detailing without removing too much product.
Avoid coarse files with grit levels below 150, as these can create micro-fractures in the gel or generate excessive heat through friction. Metal files should also be avoided, they create heat quickly and can cause the gel to shatter or separate from the natural nail. Professional-grade files are worth the investment because they maintain consistent grit, work more efficiently, and last longer than drugstore alternatives.
Proper filing technique: the foundation of success
Before you begin filing, establish your guide point. Imagine a straight line running from the center of your cuticle to the center of your free edge, this is your symmetry anchor. This visualization helps make certain that your filing maintains balance and creates an even shape across all nails.
The cardinal rule of filing cured gel is to file in one direction only. Never use a sawing back-and-forth motion. This repetitive friction generates heat that can weaken the bond between the gel and your natural nail, potentially causing lifting at the stress points near the sidewalls. One-directional filing also gives you better control and produces smoother results.
Hold your file at a 45-degree angle under the free edge rather than flat against the top surface. This angle protects your top coat from being filed away and creates a naturally tapered finish that looks professional and polished. Apply light, consistent pressure, you’re refining, not aggressively removing product. Work slowly and check your progress frequently, comparing all nails to confirm they remain balanced and symmetrical.
When reshaping from square to oval or almond, start by gently filing the corners at an angle, gradually working toward your desired curve. Take your time with this process, removing less than you think you need to at first. You can always file more, but you can’t add gel back once it’s removed.
Post-filing cleanup: the finishing touch
Once you’ve achieved your desired shape, proper cleanup is necessary. Use a clean, dry nail brush to sweep away all gel dust from the surface of your nails and from under the free edge. Gel dust can be irritating to skin and cuticles if left behind.
Next, wipe your nails with 90% isopropyl alcohol using a lint-free pad or cotton round. This removes any remaining debris and restores shine to the nail surface. The alcohol also helps reveal any spots you might have missed during filing, allowing you to make final adjustments if needed.
Finish by applying cuticle oil, jojoba oil is particularly effective for gel nails. This oil acts as a plasticizer, penetrating the gel enhancement to lock in moisture and maintain flexibility. This step prevents the gel from becoming brittle over time, which can lead to cracking or shattering. Massage the oil into your cuticles and the surrounding skin as well to maintain healthy tissue around the nail.
The professional advantage
At Xpert Russian Manicure Salon, our technicians use precision e-file technology for architectural shaping that creates optimal nail structure from the start. Our dry preparation method, performed entirely without water, maximizes gel adhesion by making certain the nail plate is completely dehydrated. This scientific approach means our clients’ gel manicures are engineered for durability, reducing the need for home filing while making any necessary adjustments safer and more effective when they do occur.
Common mistakes to avoid when filing cured gel nails
Even with the best intentions, certain errors can compromise your gel manicure’s integrity or damage your natural nails. Understanding these common pitfalls helps you avoid costly mistakes.
Using inappropriate tools
Metal files are one of the worst choices for gel nails. They generate excessive heat through friction, which can cause the gel to separate from the natural nail or even burn the nail bed. Similarly, never use cuticle nippers to clip gel corners. Cuticle nippers are designed for delicate skin tissue, not hardened gel product. If you absolutely must remove gel corners before filing, use proper nail nippers designed for thick materials, and cut diagonally, removing less than you think is necessary. However, filing is always the safer option.
Filing French manicure tips
This is perhaps the most critical mistake to avoid. Never file French manicure tips after curing. The white tip in a French manicure is a distinct pigment layer at the free edge. When you file this area, you break the protective top coat seal over that specific color layer. This makes the white pigment porous, allowing it to absorb stains from clothing dyes (especially dark denim), makeup, or heat. Your pristine white tips can quickly become dingy or yellowed. If a French manicure needs reshaping, it requires professional attention and a fresh application of top coat to re-seal the edge.
Over-filing and product thinning
Aggressive filing removes too much gel product, which weakens the structural integrity of the enhancement. Remember that gel nails are engineered with specific thickness and apex placement to provide strength and flexibility. When you thin the gel excessively, you compromise this architecture, making the nail more prone to cracking or breaking. Over-filing can also expose the natural nail underneath, leaving it vulnerable to damage from environmental factors or chemical exposure.
Creating heat through friction
Rapid, back-and-forth sawing motions generate heat that can cause serious problems. This heat can trigger lifting at the edges, create a burning sensation in the nail bed, or even cause the gel to become brittle. The bond between gel and natural nail is chemical, but it can be disrupted by excessive heat. Always file slowly, in one direction, with moderate pressure to minimize friction and heat buildup.
Skipping proper cleanup
Failing to remove gel dust after filing is more than just a cosmetic issue. Gel dust particles can irritate the skin around your nails and cuticles, potentially causing inflammation or allergic reactions in sensitive individuals. These particles can also get trapped under the free edge, creating a breeding ground for bacteria. Always brush away dust thoroughly and wipe with alcohol to make certain you have a clean, safe finish.
Ignoring professional nail architecture
Professional gel applications, particularly those at Xpert Russian Manicure Salon, are engineered with specific structural elements. The apex, the highest point of the gel, is strategically placed to provide maximum strength and prevent stress fractures. When filing at home, respect this architecture. Avoid filing the surface of the nail or the apex area; focus only on the free edge and sidewalls. Our precision e-file techniques create this optimal structure, and home filing should preserve rather than disrupt it.
When to file at home vs. when to visit a nail salon
Knowing your limits is necessary for maintaining both your manicure and your natural nail health. Some adjustments are perfectly safe for home care, while others require professional expertise.
Appropriate situations for home filing
Minor shape refinements are ideal for DIY filing. If you have a slightly sharp corner that’s catching on fabric or a small uneven spot on the free edge, you can safely address these issues at home with a fine-grit file. Managing fast nail growth between salon appointments is another practical reason for home filing. If your nails grow quickly and become unmanageable before your scheduled visit, gentle filing can maintain a comfortable, functional length. Removing a small application ridge or smoothing a minor imperfection is also within the scope of safe home maintenance, provided you use the proper technique and tools.
Situations requiring professional attention
Significant shape changes, such as transforming square nails into almond or stiletto shapes, should always be handled by professionals. These dramatic alterations require precise technique, specialized tools, and an understanding of nail architecture that most home users don’t possess. Correcting major application errors, such as excessively thick gel or severely uneven surfaces, also requires professional intervention. Attempting to fix these issues at home often makes them worse.
If you’re experiencing lifting, peeling, or separation at the free edge, don’t try to file it away. These are signs of adhesion failure that require proper removal and reapplication. Reshaping French manicures or complex nail art should never be attempted at home, as you’ll inevitably damage the design. Similarly, thinning excessively thick gel overlays or extensions requires professional e-file skills to avoid damaging the natural nail underneath.
The Xpert Russian Manicure advantage
At Xpert Russian Manicure Salon, our precision e-file techniques and architectural nail engineering create gel structures that rarely require home adjustments. Our dry preparation method maximizes adhesion, making certain that your manicure maintains its integrity for three to five weeks. When you do need reshaping or refinement, our gentle professional techniques protect your natural nail health while achieving flawless results. Our technicians understand the biomechanics of nail structure and can make adjustments that preserve both aesthetics and durability, something that’s difficult to replicate at home without professional training and equipment.
Final words
Filing gel nails after curing is not only safe but can be an effective way to maintain your manicure between salon visits, when done correctly. The key lies in using appropriate tools (180-grit for reshaping, 240-grit for smoothing), applying proper technique (one-directional filing at a 45-degree angle), and understanding the limits of DIY maintenance. While minor adjustments are perfectly manageable at home, significant changes or corrections require professional expertise to protect both your gel enhancement and your natural nail health.
Remember that not all gel manicures are created equal. The precision techniques used at Xpert Russian Manicure Salon, including dry preparation, e-file shaping, and architectural nail engineering, create gel structures that minimize the need for post-cure adjustments. Our approach maximizes adhesion and durability, giving you a manicure that maintains its flawless appearance for weeks without requiring frequent touch-ups or filing.
When in doubt, prioritize your nail health by seeking professional guidance. The few minutes saved by attempting complex reshaping at home aren’t worth the potential damage to your natural nails or the shortened lifespan of your manicure. For truly lasting, polished results that stand up to your professional lifestyle, experience the difference that precision nail care makes.
FAQs
Can you reshape gel nails after getting them done?
Yes, reshaping is possible, but the extent of change determines whether you should do it yourself or seek professional help. Minor adjustments, like softening a sharp corner or slightly rounding a square edge, can be done at home with a 180-grit file and proper technique. However, significant shape changes, such as transforming square nails into almond or stiletto shapes, should be handled by professionals to maintain structural integrity and prevent damage.
Will filing gel nails cause them to peel or lift?
Proper filing technique should not cause peeling or lifting if the gel was applied correctly to a well-prepared nail. High-quality gel products bond tenaciously to the nail plate through chemical adhesion. The dry preparation method used in Russian manicures at Xpert Russian Manicure Salon maximizes this adhesion by making certain the nail is completely dehydrated before application, making filed edges highly resistant to lifting even after post-cure adjustments.
Can you file gel polish or only hard gel?
Both gel polish and hard gel can be filed after curing, but they require different approaches. Hard gel and builder gel are specifically designed for structural applications and actually require filing as part of the shaping process. Gel polish, being thinner, requires gentler technique with finer grit files (240-grit or higher) to avoid removing too much product or damaging the natural nail underneath.
What’s the best nail file for gel nails?
For reshaping cured gel nails, a 180-grit file provides the ideal balance of efficiency and gentleness. For smoothing and minor refinements, use a 240-grit file or flexible emery board. Avoid coarse files below 150-grit and metal files, as these can generate excessive heat, create micro-fractures, or damage the gel’s structure. Professional-grade files maintain consistent grit and produce superior results.
How do you fix gel nails that are too thick?
Excessively thick gel nails are best addressed by professionals using precision e-file techniques. While home buffing with a 240-grit file can help smooth the surface, there’s significant risk of removing too much product or creating an uneven surface. At Xpert Russian Manicure Salon, architectural nail engineering during application prevents this issue entirely by creating optimal gel thickness and apex placement from the start, providing both strength and a natural appearance.