Busy professionals and beauty lovers across the US, Canada, and the UK are asking how to keep nails looking polished for more than a week or two. Many of them are landing on one powerful idea, learning how to do a Russian manicure for cleaner cuticles and longer gel wear. This precise dry manicure technique is now a favorite for anyone who wants neat, office-ready nails that still look flawless on a night out.
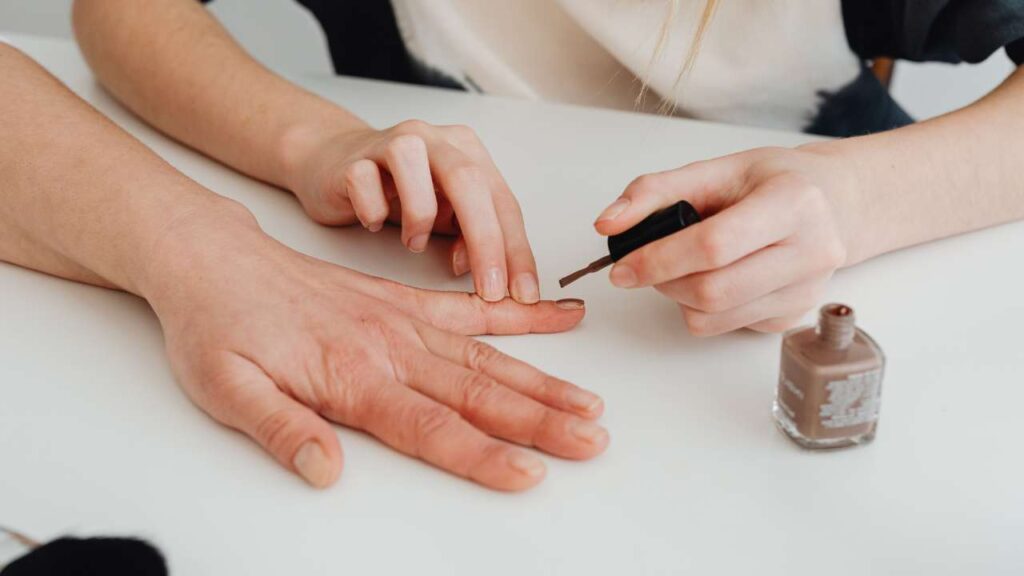
A Russian manicure, sometimes called a dry manicure or e-file manicure, is done on dry skin using an electric file instead of soaking in water. The focus is on careful cuticle work and thorough nail prep so gel can be applied close to the skin without flooding or damage. Done well, this Russian manicure technique can keep gel polish looking fresh for three to five weeks.
That is very different from a regular manicure, which usually involves soaking, cuticle softeners, and quick clipping with nippers. Water causes the nail plate to swell and then shrink, which makes chipping far more likely. The dry manicure technique avoids that problem and, with the right steps, gives a smoother, more polished result.
As many Russian manicure educators like to say, “Long-lasting gel starts with how you treat the cuticle, not just which polish you choose.”
This guide walks through everything needed before trying it. It works as a Russian manicure tutorial for curious beginners and also as a clear explanation for anyone planning to book with a trained specialist. By the end, the process of how to do a Russian manicure will feel clear, structured, and far less intimidating.
What is a Russian manicure, and how is it different from a regular manicure?
At its core, a Russian manicure is a dry manicure technique that relies on an electric file and tiny diamond bits instead of soaking and quick cutting. All work happens on dry nails, which makes it easier to see where dead skin ends and living skin begins. This careful approach is what helps gel stay put and look tidy for weeks, so many people now search specifically for Russian manicure vs regular manicure comparisons.
To understand why it works so well, it helps to know the difference between the cuticle and the eponychium:
The cuticle (also called pterygium) is the thin film of dead skin stuck to the nail plate. That is the part that should be removed.
The eponychium is the living ridge of skin at the base of the nail, the little cuff that protects the nail matrix. That should never be cut or drilled, because injury there can lead to pain, swelling, and thick, fast regrowth.
Water is another big difference. In a traditional manicure, nails soak in warm water so the skin softens. The natural nail plate absorbs that water and expands. When gel or regular polish goes on top of this swollen surface, it starts to lift or chip soon after as the nail dries and shrinks again. With a Russian manicure, the nail stays dry from start to finish, so product bonds to a stable surface.
Some quick comparisons help make the picture clearer:
The Russian approach relies on an e-file with diamond bits, while a regular manicure uses clippers, nippers, and a hand file. This allows the nail technician to remove only dead tissue and refine small areas that hand tools often miss. The result is a smoother, more controlled cuticle removal manicure.
Traditional services often move quickly and focus on trimming visible skin, which can nick the eponychium by accident. A Russian manicure slows things down with detailed passes of the e-file, always targeting the thin dead film on the nail plate instead of the living ridge. This is one reason many clients notice calmer, healthier skin around the nails over time.
A standard manicure can take about an hour, while a full Russian manicure with gel can take up to two hours. That extra time is spent on deep cleaning of the sidewalls and cuticle pocket. For clients, this usually means fewer appointments on the calendar because the manicure wears much longer.
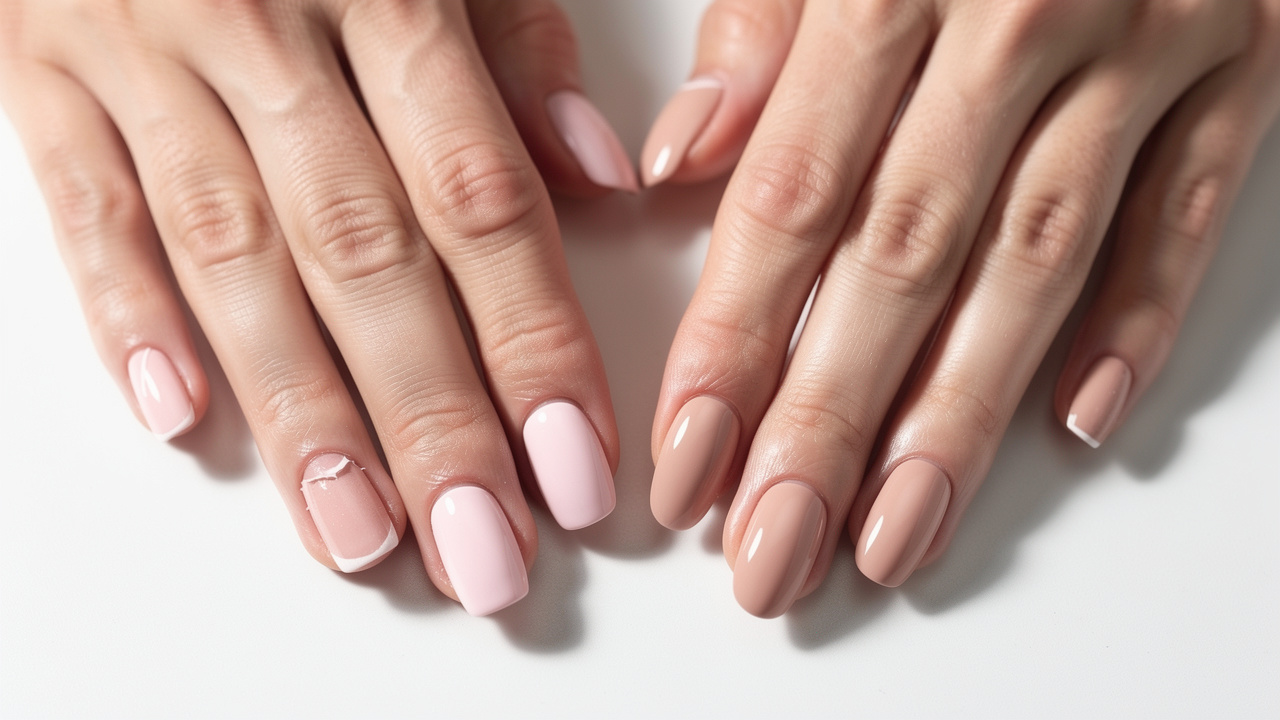
For regular gel, polish is usually placed a small gap away from the cuticle line so it does not flood. In a Russian manicure, the nail is so clean that gel can be tucked just under the proximal nail fold in a very thin line. Growth is less obvious, and the nails keep that just-done look far beyond the two-week mark.
Many nail professionals view this method as a very high standard for structure, hygiene, and neat detail, which explains why interest in how to do a Russian manicure keeps rising.
Russian manicure tools?
Before thinking about technique, it is wise to understand the tools used in a Russian manicure. The right setup can mean the difference between a polished, long-lasting result and real damage to the nail plate or skin. This section gives a practical overview of Russian manicure tools so anyone reading can decide what feels realistic to handle at home and what may be better left to a pro service.
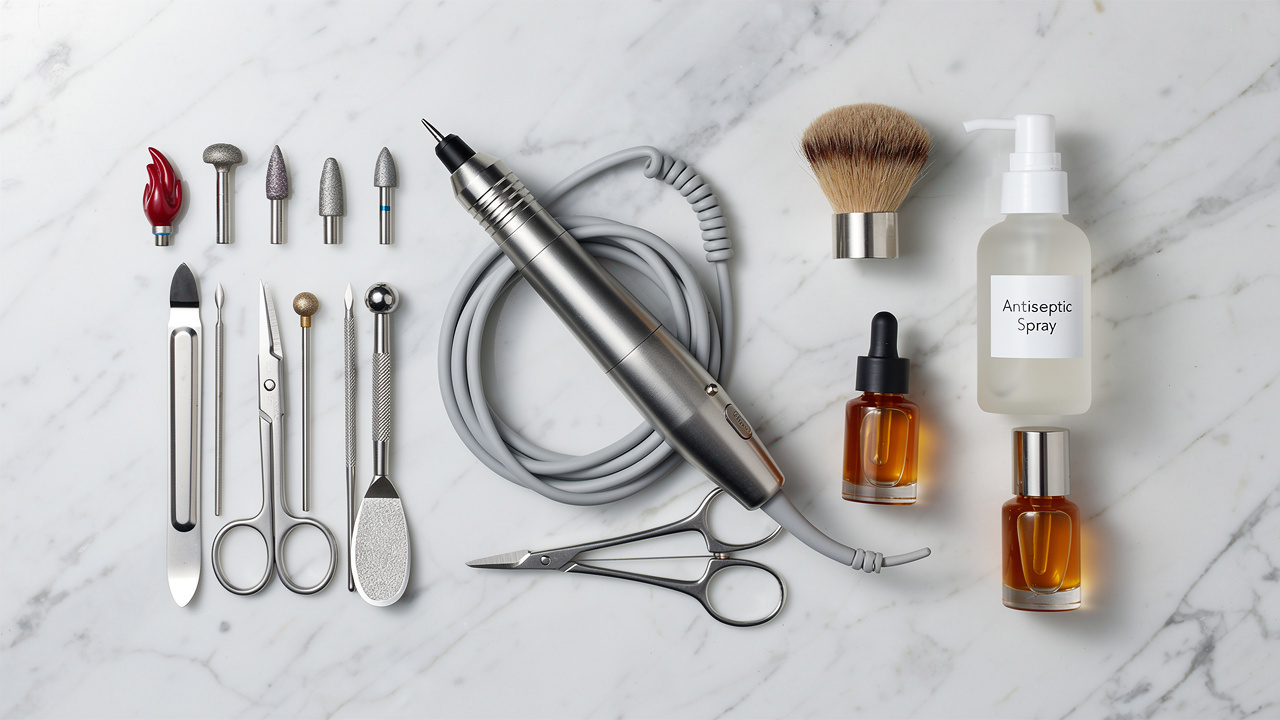
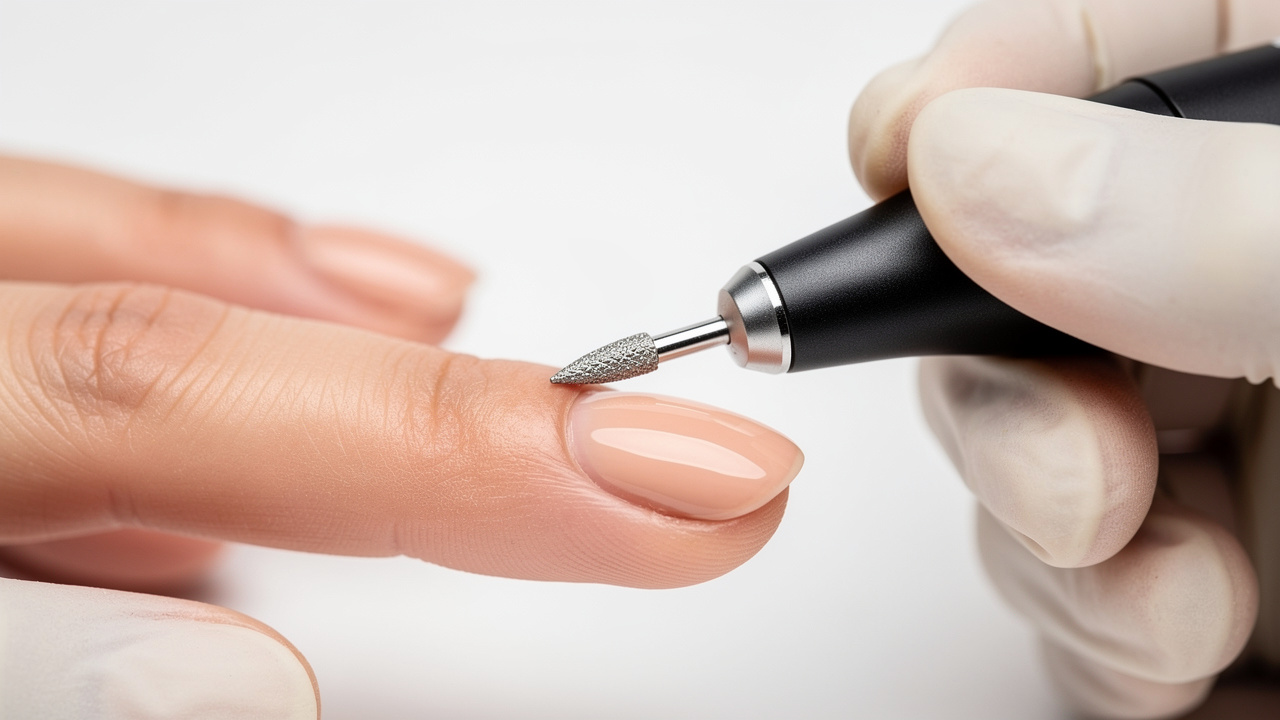
The heart of the service is a professional Russian manicure e-file. This is not the same as a cheap battery drill sold in general beauty kits. A salon-grade electric file has strong torque, adjustable speed, and very little vibration, plus a forward and reverse setting. For delicate cuticle work, nail technicians often work in the range of ten thousand to fifteen thousand revolutions per minute, which allows the bit to glide without heat or drag when used correctly.
Diamond bits are the next key part of the setup and often come up in searches for Russian manicure bits. A fine red diamond flame shape is used to open the cuticle pocket and clean the nail plate. When held parallel to the surface, it can lift the dead film without digging into the nail. Many experts, including those at Xpert Russian Manicure Salon, learn a one-bit method that uses this single flame shape for almost the entire cuticle pocket routine. A small ball bit helps polish away any lifted dead skin, and a slim cone shape refines the sidewalls for a crisp outline.
A common rule among pros is, “If your e-file rattles, overheats, or jumps, it is not the right tool for cuticle work.”
A heavy metal cuticle pusher supports this electric work. Held at about a forty-five degree angle, it gently nudges the proximal fold back and exposes the tight channel of dead cuticle underneath. This step should feel like firm pressure, not scraping, and sets up the e-file to reach every bit of built-up skin without harming the living ridge.
Several support tools round out a safe electric nail file manicure kit:
Fine-tipped manicure scissors or nippers to snip away a thin ring of lifted dead skin if it does not buff away cleanly
A nail dust collector to pull in the fine powder that comes off during filing, especially helpful for e-file manicure at home practice
A soft dust brush to clear the plate between steps
Antiseptic spray to keep hands clean before and after the service
Nourishing cuticle oil to bring moisture back after all that careful prep
Quality matters here, since dull bits or a shaky e-file can lead to heat, scratches, and uneven work.
How to do a Russian manicure step by step
Once the tools and safety basics feel clear, the next question is exactly how to do a Russian manicure step by step. This part of the guide works as a straightforward Russian manicure tutorial, so readers can follow along at home or simply understand what should happen during a salon visit. The focus is on calm, careful motions, never on speed.
Step 1 — preparation and nail assessment
Start on clean, dry hands and spritz both sides with antiseptic spray instead of soaking them in water. Look closely at the nail plate, sidewalls, and surrounding skin so any thin spots, peeling, or redness are spotted before the e-file comes near the area.
If there is existing gel or builder gel, remove it with a carbide or ceramic bit at a low to medium speed, keeping pressure soft and steady. Once the old product is gone, shape the free edge with a hand file into the form that suits daily life, such as:
Short square for heavy typing
Soft almond for dressier settings
Rounded edges for those who are hard on their hands
This basic shaping sets up the structure before cuticle work begins.
Step 2 — precise cuticle work
This is the most technical part of how to do a Russian manicure and the step that gives the method its reputation. Use a heavy metal pusher held at a gentle angle to ease the proximal fold back and reveal the cuticle pocket hidden underneath. That thin band of pterygium attached to the nail plate is the only tissue that should be removed, while the eponychium, the living skin cuff, stays intact as a natural seal.
Place a red fine diamond flame bit into the e-file and set the speed roughly between ten and fifteen thousand revolutions per minute. Keep the bit parallel to the nail and use light strokes that move along the plate and into the sidewalls without pausing in one spot. This lifts and clears the dead film from the plate and from the sinus area where the sidewall meets the base of the nail.
A small ball bit can then glide over the lifted strip of dead tissue, polishing away the last dry edges for a perfectly clean frame. Many seasoned technicians, such as those at Xpert Russian Manicure Salon, work with a one-bit method, using only the flame shape with highly refined control, which shows just how much skill this stage demands.
Step 3 — gel polish application
With prep complete, Russian manicure nail prep sets the stage for stronger gel wear. Sweep a soft brush over every nail to remove dust from the plate and folds, then wipe with a cleanser or dehydrator to remove natural oils. This dry surface gives the base coat the best chance to bond straight to the keratin, which is the key to long wear for anyone following a gel nails at home tutorial or in a studio.
Apply a structured or rubber base gel in a thin, controlled layer, adding a gentle apex if the nails are longer or prone to bending. Color can then be applied in two thin coats, carefully tucked just under the proximal fold for that seamless look with slow, even regrowth. Cure each layer under an LED or UV lamp according to the brand directions, then seal everything with a glossy top coat. Finish by massaging cuticle oil into the skin to restore softness after the dry work and lock in that freshly done shine.
E-file safety rules every beginner must follow
An electric file turns how to do a Russian manicure from theory into practice, but it also brings real risk if handled roughly. Many beginners feel nervous about this step, and that caution is wise. Treated with respect, though, the e-file becomes a precise tool rather than something to fear. These safety basics are especially helpful for anyone searching for an e-file nail technique for beginners or planning an e-file manicure at home.
Start at the lowest speed setting and only increase it once the hand feels steady and controlled. Working fast before control is in place makes it easy to slip or dig into the plate. A slower speed gives the brain time to react, notice heat, and correct angles. With practice, the hand will feel more stable and speeds in the cuticle range will feel comfortable.
Keep the bit moving at all times, sliding across the nail in smooth, planned paths. Holding a spinning bit in one place builds friction and heat, which can cause a burning sensation or a ring mark on the plate. Light, repeated passes are much safer than a single long press. Think of the motion as gentle polishing, not drilling.
Use very light pressure so the bit does most of the work. Pressing down hard strains both the natural nail and the motor of the e-file. If nothing seems to be happening unless pressure is heavy, the bit may be too coarse or too dull. In that case, change the bit rather than forcing it.
Keep the working part of the bit parallel to the surface of the nail or skin. Tilting the bit sharply focuses all power on a tiny point and can carve a groove in the plate. A parallel angle spreads the contact and lets the abrasive surface glide instead of gouge. This habit also gives a smoother finish, which saves time during later steps.
Move your hand in the opposite direction of the bit rotation for better control. When the bit turns to the right, glide the hand from right to left across the nail, and reverse this pattern when the rotation is switched. This simple habit keeps the handpiece from jumping or skipping, which is vital for a clean electric nail file manicure.
Protect lungs and skin by working over a nail dust collector and wearing a mask if dust lingers in the air. The fine powder from gel and skin can irritate breathing over time. A collector pulls most of that away so practice sessions stay safer and more comfortable.
Anyone who wants to follow a Russian manicure beginner guide should expect plenty of practice on their own nails before touching another person’s hands. Many learners choose to combine home practice with a course or in-person coaching from a trained Russian manicure specialist.
Conclusion
The Russian approach to nail care brings together dry prep, detailed cuticle cleaning, and careful gel application to create a manicure that can last three to five weeks. Instead of rushing through soaking and quick trimming, it treats the nail as a tiny canvas that needs a clean, stable base. For many clients, that means fewer chips, smoother growth, and calmer skin around the nails.
Learning how to do a Russian manicure takes patience and respect for both the e-file and the biology of the nail. Step-by-step guidance can shorten the learning curve, yet true finesse usually comes from time on the handpiece and watching experienced technicians work. Salons that specialize in this method, such as Xpert Russian Manicure Salon, build their reputation on this kind of precision.
For some readers, the best next move will be slow, careful practice at home with beginner settings and simple shapes. Others may prefer to book with a certified Russian manicure artist and enjoy the benefits straight away. In both cases, understanding the process helps anyone choose safer services and longer-lasting nail care.
FAQs
Can I do a Russian manicure at home as a beginner?
Yes, many people learn to perform a Russian manicure at home, but it calls for patience and a gentle hand. Start with low speed on the e-file, light pressure, and focus only on the nail plate and obvious dead skin at first. Before working near the cuticle pocket, study a trusted Russian manicure beginner guide or professional videos. Treat early attempts as practice sessions and give yourself time to gain confidence with e-file manicure at home methods.
How long does a Russian manicure last compared to a regular manicure?
A well-executed Russian manicure often wears for three to five weeks without lifting or major chipping. Regular gel manicures usually last around two weeks before growth and edge wear show clearly. The dry prep and close under-fold polish line give the Russian method a clear edge in Russian manicure vs regular manicure comparisons.
What is the best e-file bit for Russian manicure cuticle work?
For most technicians, the red fine diamond flame bit is the main tool for cuticle pocket work. It can gently lift the dead film from the nail plate and sidewalls when held parallel to the surface at moderate speed. A small ball bit then smooths any lifted tissue that remains. These two shapes sit at the center of many professional Russian manicure tools kits and are often mentioned in guides to Russian manicure e-file practice.
Is a Russian manicure safe for sensitive skin or damaged nails?
For sensitive yet otherwise healthy skin, the dry technique can feel gentler than repeated soaking, which sometimes leads to swelling and peeling. However, it is not right for nails that are severely thin, peeling, or affected by fungal infection, and it should never be done over open cuts. In those cases, a dermatologist or medical professional is the better starting point than any professional nail prep at home routine. Once the nails recover, a skilled Russian manicure technician can adjust Russian manicure nail prep to suit the condition of the hands.